Michelle's Little Creations

Showing posts with label Wood veneer. Show all posts

Friday, April 8, 2016

Project Life Friday


Good morning all, I hope you are well! Welcome back to PL Friday. Thhis week I am showing you week 10 of 2016. Im using the Project Life it from HKC, I believe February? Most of my weeks just include random things from our week. Atrip to Huck Finn looking at furniture and beds, basement progress, me sick for a week (as it turns out, with the flu!), a trip to Batrnes aand Noble (swoon!), and the girls at their favorite spot, K1 Speedway! So, here we go, the spread as a whole. I alson include the girls STAT sheets from K1, but I didnt show that.


This is a close up of the left side of the sparead. Which for me is typiclaly Mon-Wed. I'm sure my girls will be thrilled I am showing the top pic! On non school days they stay up late watching movies and just crash. Sally liked the added company I see! With this new deisgn size, Iam free to add the cute little pics from Facebook that I find or that people tag me in, a definete perk for me.


Right side, me at the dr, my sweet scaredy fosters B&N purchases and the girls. Pretty basic, but I like it. I backed the wood veneer pieces with pattern paper to make it pop more on the pictures. The goodies from thses Hip Kits go on forever, Ive done so many pages and still I have alot left!


That is all peeps, I hope you found some inspiration in what youve seen here. Come back later for my post on what the challenges are I will be doing this weeend. Also stop back Sunday for the challenge reveals. Thanks again for stopping by.

Pin It

Thursday, April 7, 2016

Using Project Life in your Scrapbook Pages

Good morning all! Welcome back to the next Using PL in your Scrapbook Pages Thursday. For this layout I used one 4x6 card, and two 3x4 cards. The 4x6 card is from an old Studio Calico PL kit, and the  two 3x4 cards are from the Maggie Holmes cut apart sheet Wonder collection. I also used the Wonder collection chipboard stickers to accent with. Other items I pulled in were, washi, a couple label stickers, a wood veer ampersand and Teresa Collins alpha. I backed my layout with a piece of black diagonal stripe (middle cut out of course, waste not want not!). My daughter Hannah started taking horseback riding lessons, and the start of every lesson is grooming. She says it's her favorite part, time with just her and Winnie!


I really love the simplicity this layout has, you can really focus on the picture and how relaxed they seem. I hope you enjoyed this weeks layout, stop back next Thursday for another of the same. Tomorrow will be Project Life Friday, come check it out.
Pin It

Monday, March 28, 2016

Kill A Kit Monday

Good morning all! Today marks the first day in my "weekly Schedule posts". I hope you are all as excited as I am. This week my post will be a Hip Kit Club kill a kit. I was able to produce 2 scrapbook layouts, and a Project Life layout. The 2 Scrapbook pages have already been shared on the Hip Kit Club Facebook Forum, but I will give more detail about them here.

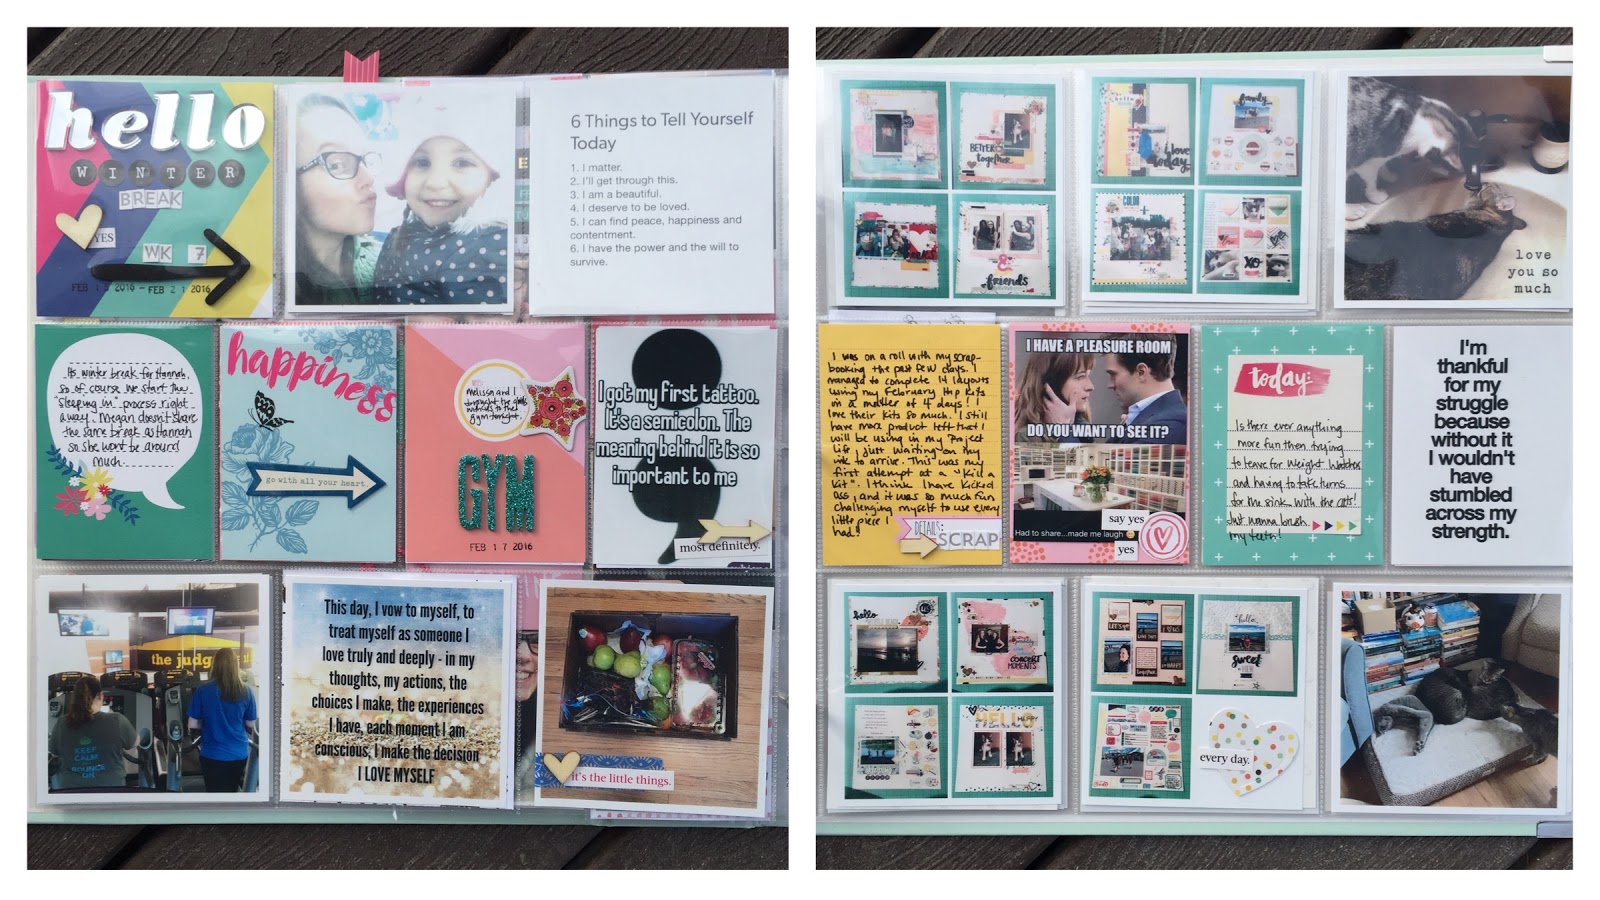
First up, this page was so fun to make! I started with my trusty Gelatos in hot pink, yellow, and royal blue colored on a plastic wrapper each individually. I put a color on, then sprayed it with a water mister, folded the bag in half to blend it, and then wiped it in different spots to get the color where i wanted. I then moved on to the second color and then the third. I did notice the yellow did not pop as much as I wanted, so i used my yollow Heidi Swapp color shine to drip some around. Next I chose 3 patterned papers to cut for dow the side. For added dimension, I used my fingernail to raise the edges. I then layered my photo with patterned paper and some vellum. After that was just all the little goodies. I used the Elle's Studio labels, Basic Grey embellishments and enamel dots, some of the Pink Fresh word stickers, wood veneer hearts and bird sticker to accent the page. I just have to say I am in Love with the colors in this kit. My daughter favoritw color is blue, usually royal blue to be exsact, and its hard to find enough lines with that color to keep using. Im in my glory.


This next page is again, in need of that beautiful blue! Notice my daughters shirt and hair! The hair has faded quite a bit since first done. I love the "bordering my page" look, so I picked my background and cut the center out of it. Thou shall not waste! I then chose the patterned paper to use across the top almost half of the white paper. From there I put my Thickers title and went from there. I used the wood veneer to accent the wood form the boardwalk, and added a couple labels from Elles Studio and flowers from Basic Grey. I did pull in some of the mini alpha from October Afternoon which came in February's kit. I finished it off with Mr Heuy's color mist.


This third layout is obviously a Project Life spread. I loved the Project Life kit so much this month. Last months kit all I wanted to do was make scrapbook pages with it, I just loved it for that. For some reason this month, I am living how the Project Life is looking with this months kits. I actually got lucky, we were supposed to receive the Basic Grey Saturday Morning 6x6 pad, at the last minute she had to change some of them to the Pink Fresh Felicity 6x6 pad. I received the Felicity pad, and my dear friend Melissa received the Saturday Morning pad. They each come with 2 of each design, so we did as we many times do to save money and get more product, we split them! I love that I have someone to do that with!


On this left side, I did put a flip up. Sadly I can not figure out where I put my actually flip ups, so I decide not to waste any more time looking and used washi tape instead. I put it across the inside and outside to keep it secure. I pulled a small teal doily, washi, and an arrow paper clip from my stash. I used the cork and green pastic Thickers, the cork stichers from Basic Grey, Elles Studio bits and pieces, the black puffy arrow from Heidi Swapp, as well as Pink Fresh alphas, wood veneer hearts, and word stickers.  


On this side , more Pink Fresh word stickers ( I just love them!!!), wood veneer hearts, and vellum alpha, Basic Grey cork stickers and enamel dots. I had alot of pictures I wanted to included, but didnt want to leave out the important journalling. Behind the drink photo is a journal card with a washi pull  "tab". The oh luck me card was circle punched and the circle then put on dimensionals, behind it too is a business card with a wahsi pull tab. (I believe I forgot to put it back in prior to pic!) I had to document the "plan" my friend Melissa had for my collection of gift card, it was so funny to hear her play it all out. I wanted another pop of yellow, so I decided on the yellow alpha from Studio Calico, but didnt have an R upper or lowercase. I improvised, I used a P and cut a straight end off something I knew I wouldnt use. 


So, thats it for this week, 3 layouts.  I can get much more from this kit, so check back for more Kill A Kit pics next week. As always, I welcome comments and questions. Hope to see you again. Tomorrow will be Take from Your Stash Tuesday.
Pin It

Monday, March 14, 2016

Hip Kit Club- Kill A Kit part 4

This is the last post in this series. I had a great time doing it. I managed to complete 14 single page layouts and a Project Life spread, which included 3 inserts. I have to tell you, there is still quite a bit left, that picture will be at the end.  These last 2 pages were pretty inventive I think.  The first is using the Dear Lizzy alpha. It was a bit too busy for me, so I knew I wouldn't use it. I stuck all the letters on the top of a piece of white cardstock, and brushed white gesso on them. I repeated that 3 times to make sure it covered. I then took some Heidi Swapp color shine spritzed it on a piece of plastic packaging and whipped it on the letters. I then bordered the bottom of the letters with a piece of washi from my stash. I also pulled a piece of vellum, some rhinestone stars, enamel dots, and a doily from my stash to complete the page. I love how it turned out!


For this last page, I tool the remaining stickers from the Amy Tan pad and used it as a background. I made sure I used ones that would allow for journaling and would fit the picture. I added a piece of vellum from my stash. I think this one turned out well also! 


Now for the Project Life layout. I used the Project Life cards from the kit, as well as some of the different alphas, foam stickers, wood veneer, chipboard stickers, the mirrors sticker


Here we have the right size. I decided to showcase my epic scrapbook success! I have never created so many layouts in such a small amount of time! 4 days, I did 14 layouts in 4 days, and still went to 2 concerts, and a birthday party!


This is the front side of the first insert. Me, my daughter and my mother all went for our first tattoos.  It was a moment definetly important to document. It was a very symbolic tattoo for all of us. For the inserts I made a title card of sorts using the teal glitter alpha. 


Now we have the back side of the first insert and the front side of the second insert. We went to see STYX for the second time. It's nice that the girls enjoy the same kind of music as Steve and I. The right side is my nieces first birthday party. Again you will see the title card with the teal alpha. 


This last insert page is my daughters college concert. Yet another title card. I like that it gave the inserts a feel of unison. 


Here is the week as a whole without the inserts in the way.


Now, if you can believe it, after all those pages with all those goodies, this is what I STILL have left! I am absolutely amazed, but my new kits are here, so the remains of last months kit will have to wait for a while. So, is this something you would like to see more of? Did you like what you saw? Thanks again for checking them out. I now need to focus on my final page for the Hip Kit Design Team member submission. Wish me luck!


Pin It